Learning how to set up a WordPress salon website on Hostinger is easier than most salon owners think. In this beginner-friendly guide, you’ll create a professional salon website with an online booking system from start to finish. No coding required. No technical skills needed. If you can upload a photo to Facebook, you can follow this tutorial and launch your website today.
I still remember a message I received from a hair salon owner in Australia: “Dony, I want a website but I’m not technical at all. Is this something I can actually do myself?”
She had her salon running beautifully for six years — loyal clients, talented staff, a gorgeous space. But zero online presence. No website, no bookings page, nothing. She assumed building a website required coding skills, a big budget, or both.
Let’s get into it.
Affiliate Disclosure: This post contains affiliate links. If you sign up through my link, I earn a small commission at no extra cost to you. I only recommend tools I personally use and trust.
What You'll Need Before You Start
Before touching anything, get these ready so the process flows smoothly:
- A domain name idea — your salon name works perfectly (e.g., glamoursalon.com)
- A Hostinger account — we’ll set this up in Step 1
- Your salon logo — if you have one; if not, skip for now
- 3–5 photos of your salon — interior, staff, or your work. No professional photos yet? Grab free ones from Pexels.com — search “salon interior” or “hair salon”
- 30–60 minutes of uninterrupted time — put your phone on silent
That’s genuinely all you need. Let’s go.
Step 1 — Get Your Hosting and Domain on Hostinger
Hosting is the service that keeps your website live on the internet 24/7. Think of it as renting space on the internet where your website lives. Without hosting, your website doesn’t exist online.
I personally use and recommend Hostinger for every salon website I build — it’s fast, beginner-friendly, affordable, and includes everything you need in one place. After 300+ client projects, it’s the one I keep coming back to.
Here’s exactly what to do:
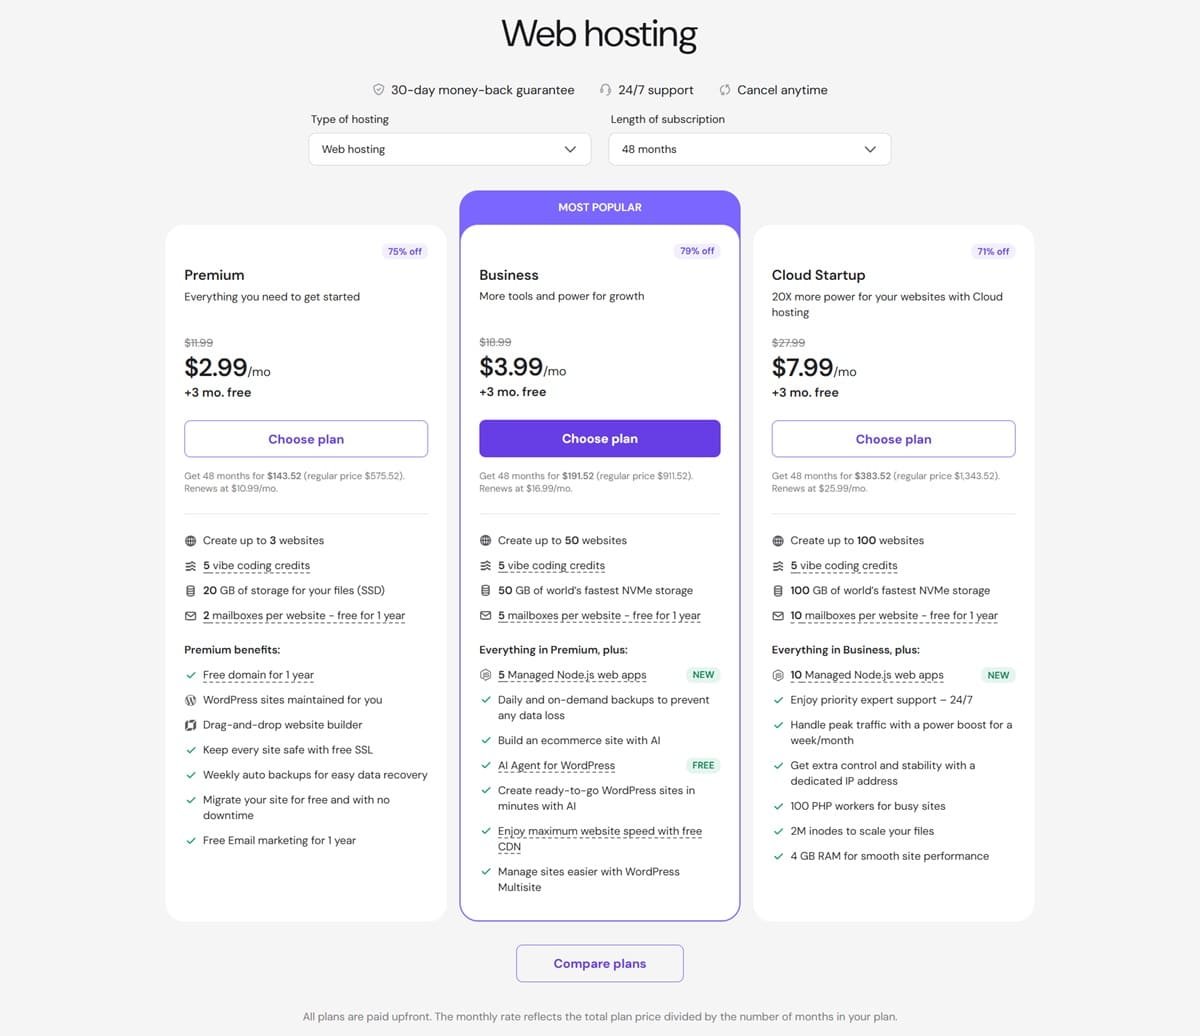
- Go to Hostinger and click Web Hosting
- Choose the Premium WordPress Hosting plan — not the Starter plan
- Why Premium over Starter? Premium includes free domain name, hosting for up to 100 websites, and more resources. For the price difference, it’s absolutely worth it
- Select your billing period — the 2-year plan gives you the lowest monthly rate ($2.99/month). This is what I recommend to every client
- Enter your domain name when prompted — type your salon name and check if it’s available. If your first choice is taken, try adding your city name (e.g., glamoursalonnyc.com)
- Complete your payment and create your Hostinger account
- Check your email — Hostinger will send you a confirmation with your login details
You now have hosting and a domain. That’s the foundation. Everything else sits on top of this.
Step 2 — Install WordPress with One Click
WordPress is the platform your website runs on. It’s free, powers 43% of all websites on the internet, and requires zero coding to use. Hostinger makes installing it incredibly simple.
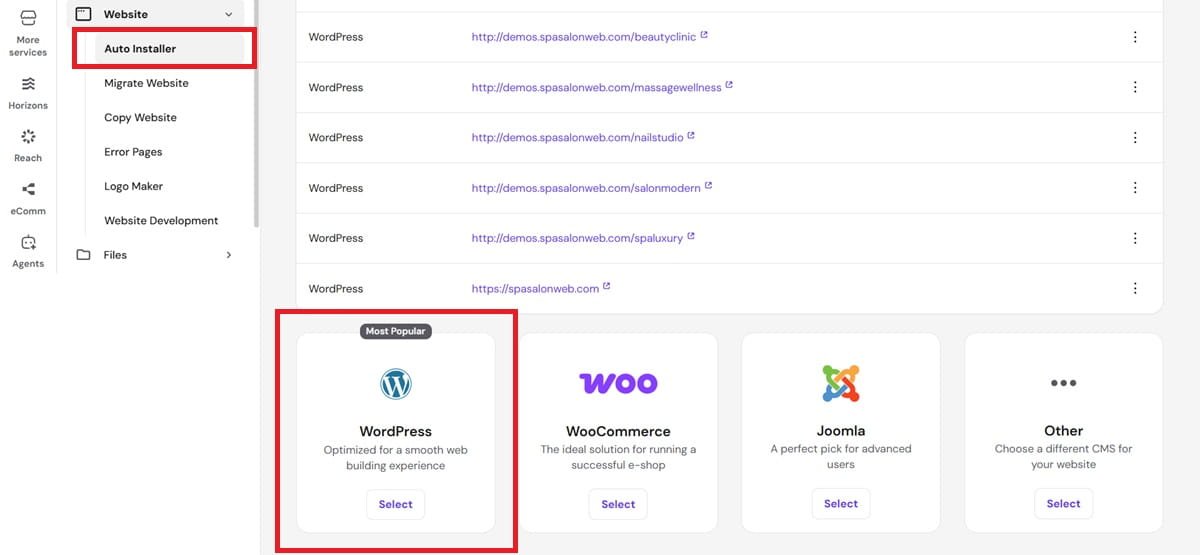
- Log into your Hostinger account at hpanel.hostinger.com
- From your dashboard, find WordPress under the Websites section and click Install
- Select the domain you just registered
- Fill in these details:
- Website title: Your salon name (e.g., Glamour Salon)
- Admin username: Choose something other than “admin” — use your name (e.g., dony)
- Admin password: Make it strong — use letters, numbers, and a symbol
- Admin email: Your business email address
- Click Install and wait about 60 seconds
That’s it. Hostinger handles everything automatically in the background.
Write down your admin username and password somewhere safe — you’ll need these every time you log in.
Step 3 — Log Into Your WordPress Dashboard
Your WordPress dashboard is your control center. This is where you’ll build every page, write every blog post, and manage every setting on your site.
To access it:
- Go to yourdomain.com/wp-admin in your browser
- Enter the username and password you just created
- Click Log In
[SCREENSHOT: WordPress dashboard — clean fresh install]
You’ll see a menu on the left side. Here’s a quick tour of what you actually need:
- Pages — where you create your Home, About, Services, and Contact pages
- Posts — where you write blog articles
- Appearance — where you install your theme and customize your design
- Plugins — where you add extra features like booking systems and SEO tools
- Settings — where you configure your site title, URL structure, and homepage
Don’t let everything else overwhelm you — you’ll only use these five sections to build your entire salon website.

Step 4 — Install Your Theme (Astra Recommended)
A theme controls how your website looks — the layout, fonts, colors, and overall style. Think of it as the interior design of your website.
I recommend Astra for salon websites. It’s free, lightning fast, works perfectly with Elementor (the design tool we’ll use later), and is trusted by over 2 million websites worldwide.
Here’s how to install it:
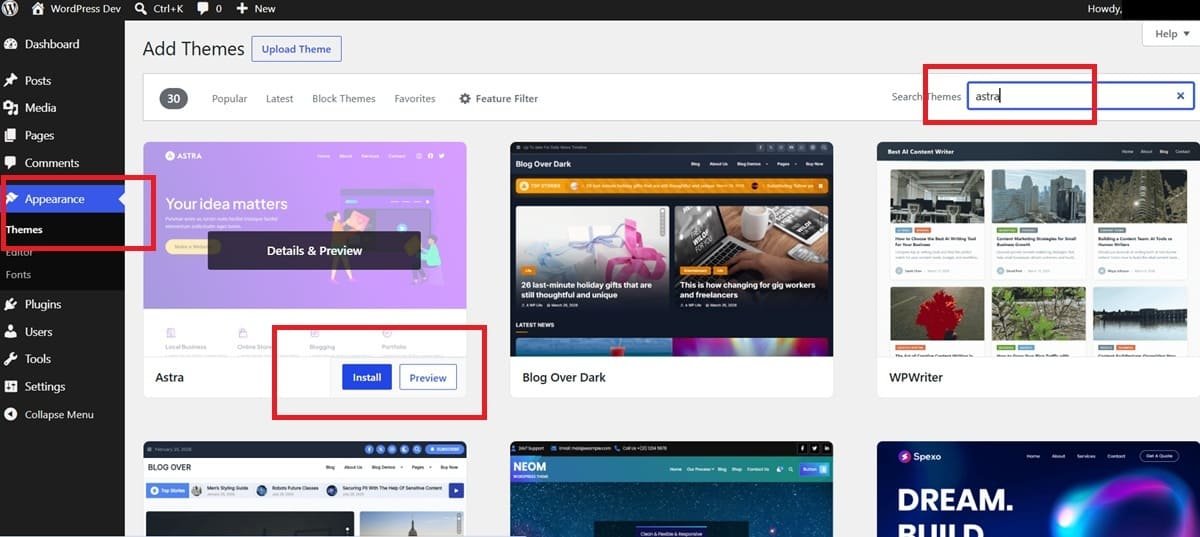
- In your WordPress dashboard, go to Appearance → Themes
- Click Add New
- In the search box, type Astra
- When it appears, hover over it and click Install
- Once installed, click Activate
Your website now has a clean, professional base to build on. It won’t look like much yet — that comes in Step 7 when we design your homepage.
If you want an alternative, Kadence is also excellent — also free and fast. Both are listed on my Recommended Tools page with more details.
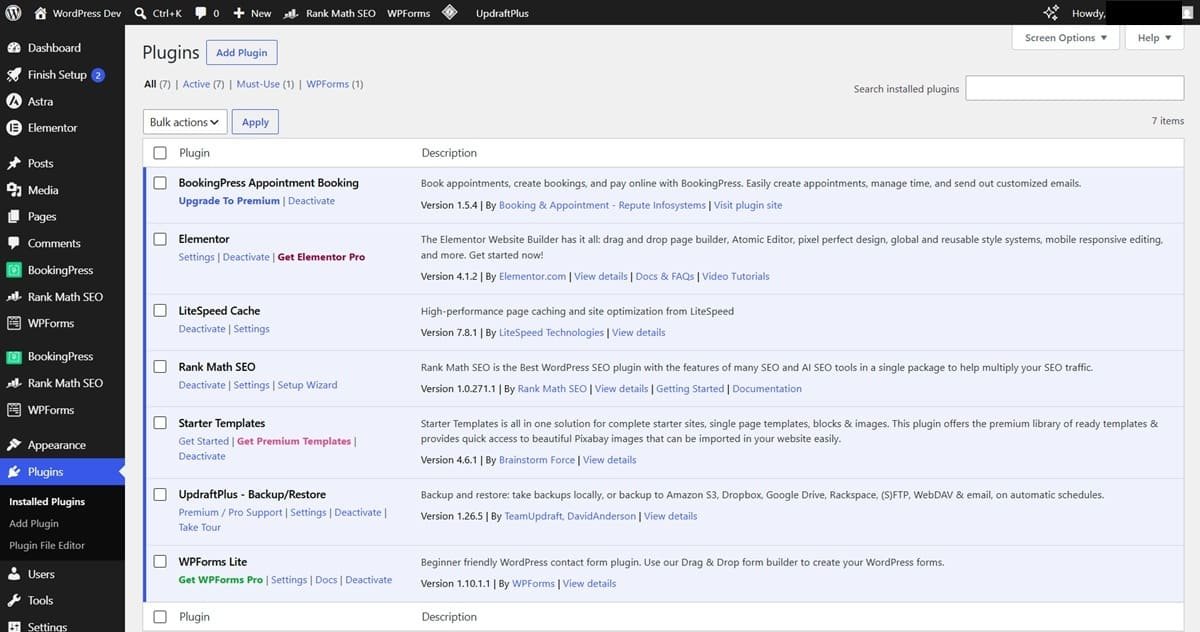
Step 5 — Install Your Essential Plugins
Plugins add features to your WordPress website. They’re like apps on your phone — you install them to add specific functionality. Here are the ones every salon website needs:
1. Elementor — Page Builder (Free) This is how you’ll design your pages visually — drag and drop, no coding. It’s what I use on every client project. → Search “Elementor” in Plugins → Add New → Install → Activate
2. Rank Math SEO (Free) Helps your website show up on Google. It guides you through optimizing every page and blog post for search engines. → Search “Rank Math SEO” → Install → Activate → Follow the setup wizard
3. WPForms Lite (Free) Creates your contact form so clients can send you messages directly from your website. → Search “WPForms” → Install → Activate
4. BookingPress (Free) Your online booking system. Clients can book appointments directly from your website, 24/7, without calling you. We’ll set this up properly in Step 8. → Search “BookingPress” → Install → Activate
5. UpdraftPlus (Free) Backs up your entire website automatically. If anything ever goes wrong, you can restore it in one click. Never skip backups. → Search “UpdraftPlus” → Install → Activate
6. LiteSpeed Cache (Free) Makes your website load faster — especially important for mobile visitors. Works perfectly with Hostinger’s LiteSpeed servers. → Search “LiteSpeed Cache” → Install → Activate
To install each plugin: go to Plugins → Add New, search the name, click Install Now, then Activate.
You can find more tool recommendations with detailed notes on my Recommended Tools page.
Step 6 — Create Your Essential Pages
Before designing anything, create the basic page structure of your website. These are the pages every salon website needs:
- Go to Pages → Add New
- Type the page title
- Click Publish
- Repeat for each page
Create these pages:
Page | Purpose |
|---|---|
Home | Your main landing page |
About | Your story, your team, your salon |
Services | What you offer and pricing |
Book Now | Your online booking page |
Contact | Address, phone, contact form |
Blog | Your articles and tips |
Don’t worry about the content yet — just create the pages with their titles. You’ll add content and design them next.
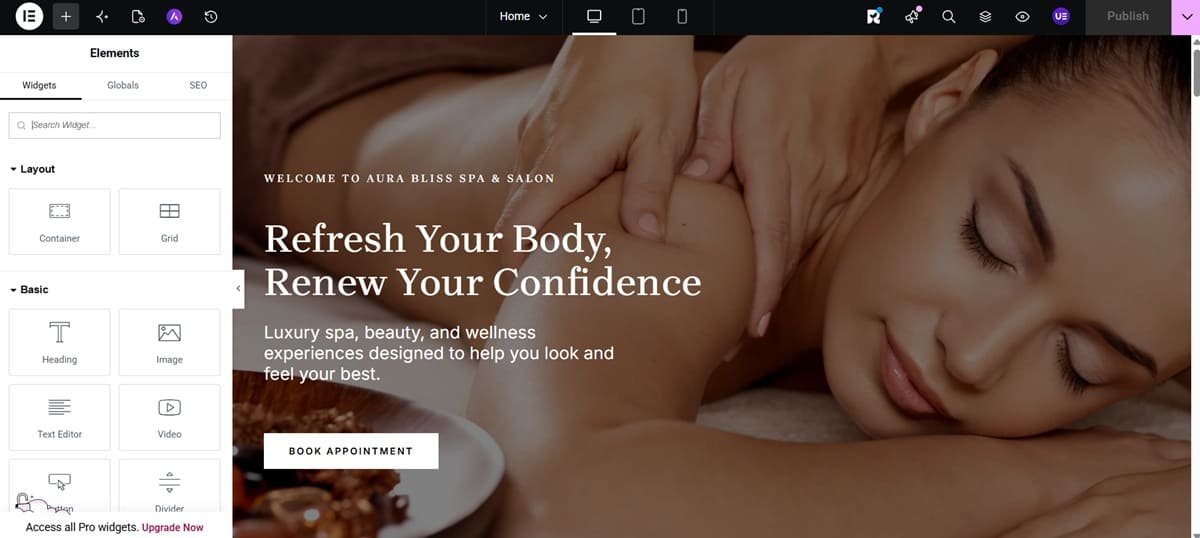
Step 7 — Design Your Homepage with Elementor
This is where your website starts looking like a real salon website. Elementor’s drag-and-drop editor makes it visual and intuitive — you don’t need to touch a single line of code.
Open your homepage in Elementor:
- Go to Pages → All Pages
- Hover over your Home page and click Edit with Elementor
- The Elementor editor opens — your page is on the right, your design tools are on the left
Build these 4 sections on your homepage:
Section 1 — Hero (Top of Page) This is the first thing visitors see. Make it count.
- Add a full-width section with your best salon photo as the background
- Add a heading: your salon name or tagline (e.g., “Book Your Perfect Look Today”)
- Add a sub-heading: one line about what you do and where (e.g., “Premium Hair & Beauty Services in [Your City]”)
- Add a button: Book Now — link it to your Book Now page
Section 2 — Services
- Add a 3-column section
- Each column: an icon, a service name, and a one-line description
- Example: ✂️ Haircut | 💆 Massage | 💅 Nail Care
Section 3 — About/Trust
- A short paragraph about your salon — how long you’ve been open, what makes you different
- Add a photo of yourself or your team
Section 4 — Call to Action
- A simple banner at the bottom: “Ready to Book Your Appointment?”
- A Book Now button linking to your booking page
Don’t overthink the design. Elementor has pre-built templates — click the folder icon inside Elementor, browse the templates, pick one that matches your salon’s style, and just replace the text and photos with your own content. This approach cuts your design time in half.
When you’re happy with it, click Publish in the top right corner.
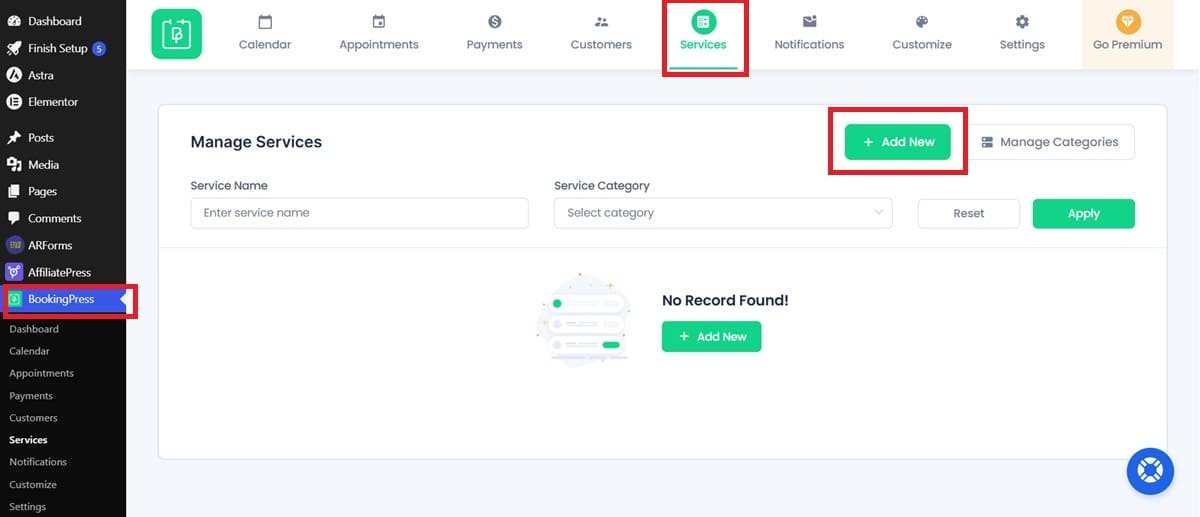
Step 8 — Set Up Your Booking System
This is the most important feature on your salon website. An online booking system means clients can book appointments at 2am on a Sunday without calling you. You wake up to new bookings already in your calendar.
We installed BookingPress in Step 5. Here’s how to set it up:
- In your WordPress dashboard, click BookingPress in the left menu
- Go to Services → Add New Service
- Add each service you offer: Haircut, Blowout, Facial, Massage, etc.
- Set the duration and price for each
- Go to Staff → Add Staff Member
- Add yourself and any team members
- Set working hours for each person
- Go to Settings → General
- Set your business hours
- Set your appointment buffer time (time between bookings)
- Set how far in advance clients can book
- Add the booking form to your Book Now page:
- Go to Pages → Book Now → Edit with Elementor
- Add a new section and look for the BookingPress widget in Elementor
- Drag it onto the page and publish
Test it before going live. Go to your Book Now page, make a test booking using a personal email address, and make sure you receive the confirmation email. Fix anything that doesn’t work before you share the site publicly.
If you want more advanced features — automated SMS reminders, multiple staff calendars, custom email templates — Amelia is the premium upgrade I recommend for busy salons. Details are on my Recommended Tools page.
Step 9 — Connect Your Domain and Go Live
Almost there. Let’s make sure everything is connected properly and your site is ready for the world.
Check your domain is connected:
- Log into your Hostinger hPanel
- Go to Domains and confirm your domain is pointing to your hosting
- If you registered your domain with Hostinger in Step 1, this is already done automatically
Set your homepage:
- In WordPress, go to Settings → Reading
- Under “Your homepage displays” select A static page
- Set Homepage to Home (the page you created)
- Save changes
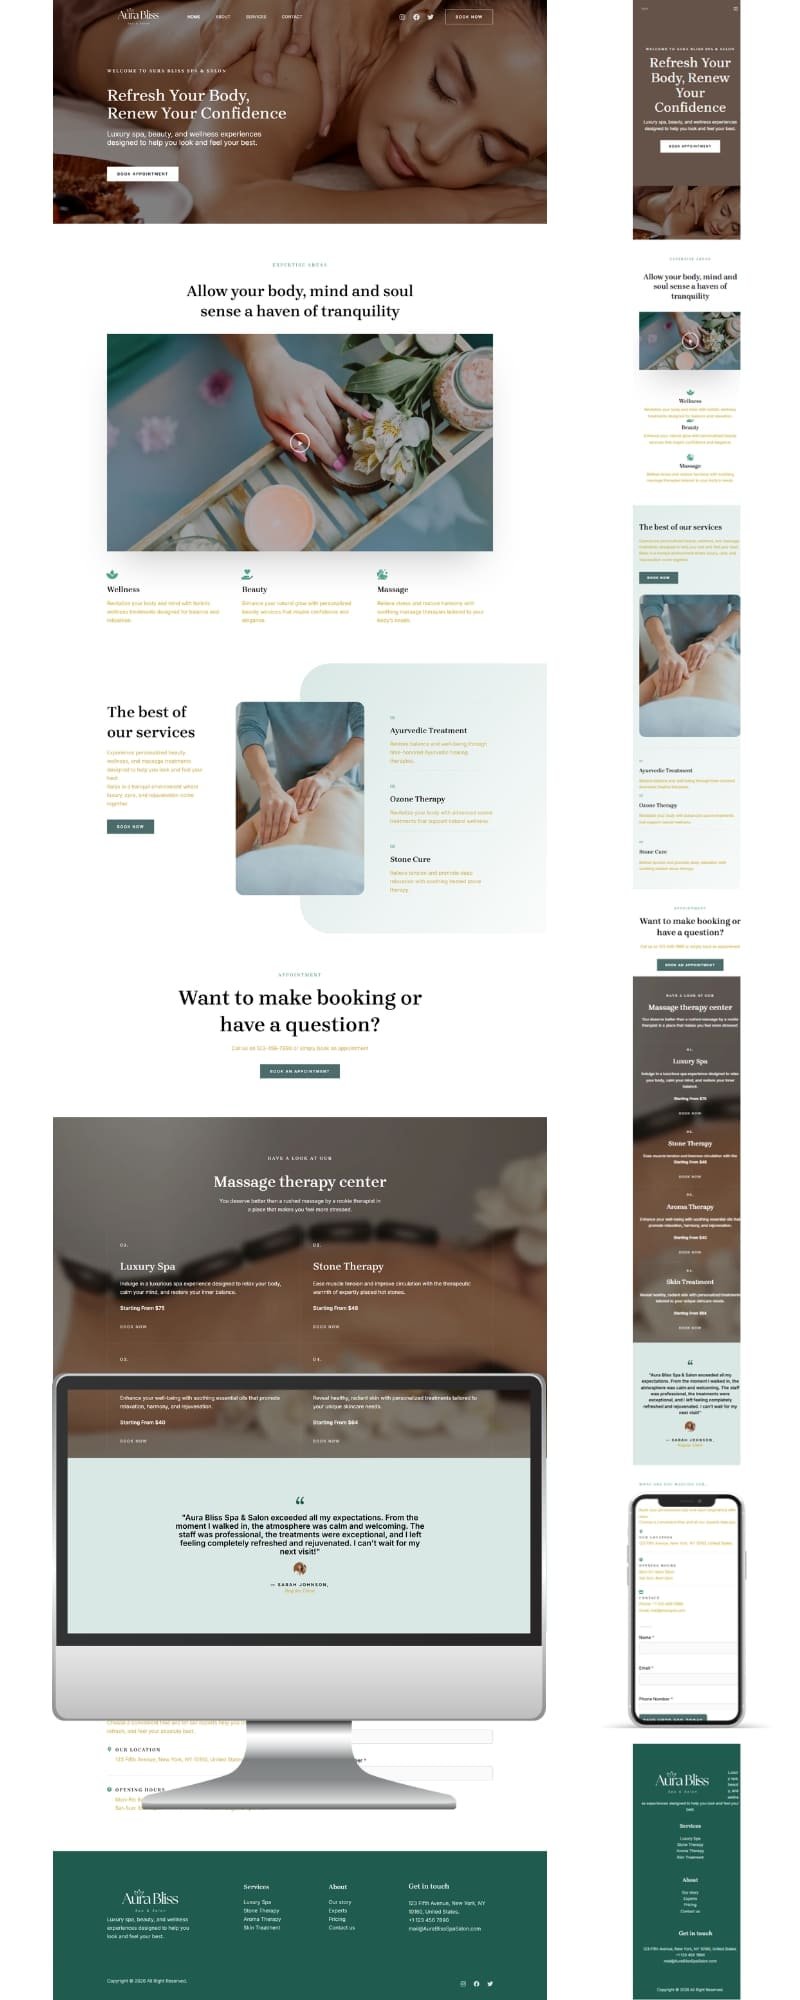
Preview on mobile:
- In Elementor, click the mobile icon at the bottom of the editor
- Check how your homepage looks on a phone screen
- Fix anything that looks off — most commonly: text that’s too large, buttons that are hard to tap, or images that are cropped wrong
Once everything looks good — you’re live. Your salon website is on the internet.
What's Next After Your Site Goes Live?
Building the site is just the beginning. Here’s what to do in your first week after launch:
Day 1 — Submit to Google Go to Google Search Console, add your website, and submit your sitemap (yourdomain.com/sitemap_index.xml — generated automatically by Rank Math). This tells Google your site exists.
Day 2 — Set Up Google Analytics Go to Google Analytics, create a free account, and connect it to your WordPress site using the Rank Math plugin. Now you can see exactly how many people visit your site and where they come from.
Day 3 — Update Your Online Profiles Add your website URL to:
- Your Instagram bio
- Your Facebook page
- Your Google Business Profile
- Any booking apps you’re already on (Treatwell, Vagaro, etc.)
Day 4 — Tell Your Existing Clients Send a message to your current client list: “We just launched our new website — you can now book online anytime at [yourwebsite.com].” Your existing clients are your first traffic source.
Day 5 onwards — Start Blogging One blog post per week builds your Google presence over time. Start with topics your clients ask you most — “how to maintain hair colour at home,” “what to expect from your first facial,” “best haircuts for round faces.” Need ideas? Check my Blog for inspiration.
You Don't Have to Do This Alone
If you’ve followed every step in this tutorial, you now have a live WordPress salon website on Hostinger — with a booking system, essential plugins, and a designed homepage. That’s a real achievement.
But I understand that not every salon owner has the time or patience to build and manage a website themselves. That’s exactly why I offer done-for-you website setup services.
Want to get started on your own? Grab your Hostinger plan here — it’s the same hosting I use for every salon site I build. Fast, affordable, and beginner-friendly.
Rather have a professional handle everything? Check my Fiverr packages — I’ll handle the entire setup for you, including the booking system, speed optimization, mobile design, and handoff training. You focus on your clients. I’ll handle your website.
Building your salon website is one of the best investments you’ll make for your business. Your future clients are searching for you right now — make sure they can find you.
Have a question about any step in this tutorial? Drop it in the comments below — I reply to every one.
Frequently Asked Questions | how to set up a WordPress salon website on Hostinger?
Q1: Do I need any coding skills to build a salon website on Hostinger?
A: No — not a single line of code. Everything in this tutorial uses visual tools. Hostinger’s hPanel installs WordPress in one click, and Elementor lets you design your pages by dragging and dropping elements. If you can use Facebook or send an email, you have enough technical skill to follow every step in this guide.
Q2: How much does it cost to set up a WordPress salon website on Hostinger?
A: The most affordable setup starts at around $2.99/month on Hostinger’s Premium plan — that includes your free domain, free SSL, and WordPress hosting. Add a free booking plugin like BookingPress and free plugins like Elementor and Rank Math, and your total year one cost can be as low as $72–$150. I cover the full cost breakdown in detail in my Salon Website Cost post.
Q3: How long does it take to complete this setup?
A: If you follow every step in this guide without interruptions, expect 2–4 hours for a basic working site. A fully designed, polished website with all your content, photos, and booking system properly configured typically takes 1–3 days of work spread across a week. The more photos and content you have ready before you start, the faster it goes.
Q4: What happens if I make a mistake during setup?
A: Nothing permanent. WordPress and Hostinger are both very forgiving — you can undo, redo, and change almost anything at any time. The only thing I’d be careful with is your login credentials — write them down somewhere safe. If you ever get completely stuck, Hostinger’s live chat support is available 24/7 and is genuinely helpful for beginners.
Q5: Can I use a free domain forever or do I have to pay eventually?
A: The free domain included with Hostinger’s Premium plan is free for the first year only. After that, domain renewal costs around $10–15/year depending on the extension (.com, .co.uk, etc.). This is completely normal — every website pays for domain renewal annually. It’s a small cost that’s absolutely worth keeping your professional web address.
Q6: Is Hostinger reliable enough for a salon website?
A: Yes — and I say that from real experience, not just marketing material. I personally host SpaSalonWeb.com on Hostinger and recommend it to every client I work with. Their uptime is consistently above 99.9%, their LiteSpeed servers load pages fast on mobile, and their support team responds quickly. For a small salon website, Hostinger is more than enough.
Q7: Can I switch from Wix or Squarespace to WordPress on Hostinger?
A: Yes, you can migrate — but it’s not a simple copy-paste process. Wix and Squarespace don’t export cleanly to WordPress. You’d essentially be rebuilding your site on WordPress, which is actually a good thing — your new site will be faster, more flexible, and cheaper to run long-term. If you need help with the migration, check my Fiverr packages — I handle full migrations regularly.
Q8: What if I set everything up but my website isn’t showing up on Google?
A: This is completely normal for a brand new website. Google typically takes 2–6 weeks to index a new site. To speed this up: submit your sitemap in Google Search Console (covered in the post-launch steps above), make sure Rank Math SEO is active and configured, and publish your first blog post as soon as possible. Fresh content signals to Google that your site is active and worth crawling.